Simple Hamburger Buns

Ingredients:

  • 1 cup milk

  • 1/2 cup water

  • 1/4 cup butter

  • 4 1/2 cups all-purpose flour

  • 1 (.25 ounce) package instant yeast (or whatever yeast you like)

  • 2 tablespoons white sugar

  • 1 1/2 teaspoons salt

  • 1 egg

Directions:

  1. In a small saucepan, heat milk, water and butter until very warm, 120 degrees F (50 degrees C).

  2. In a large bowl, mix together 1 3/4 cup flour, yeast, sugar and salt. Mix milk mixture into flour mixture, and then mix in egg. Stir in the remaining flour, 1/2 cup at a time, beating well after each addition. When the dough has pulled together, turn it out onto a lightly floured surface, and knead until smooth and elastic, about 8 minutes. Let rise for 30-35 minutes.

  3. Divide dough into 12 equal pieces. Shape into smooth balls, and place on a greased baking sheet. Flatten slightly. Cover, and let rise for 30 to 35 minutes.

  4. Bake at 400 degrees F (200 degrees C) for 10 to 12 minutes, or until golden brown.

  5. For Hot Dog Buns: Shape each piece into a 6x4 inch rectangle. Starting with the longer side, roll up tightly, and pinch edges and ends to seal. Let rise about 20 to 25 minutes. Bake as above. These buns are pretty big. I usually make 16 instead of 12.

Pizza Dough Basics

Makes 6 pizzas about 12” diameter.

Yeast is very bubbly when active.

Mix together to proof the yeast:

  • 1 ½ cup warm water (~110 F)

  • 2 teaspoons dry yeast

  • 2 tablespoons sugar

Mixing herbs, salt, and sugar into flour is easiest.

While the yeast awakens, stir together your flour mix:

  • 4 cups flour (any combination of below)

    • whole wheat flour for flavor / nutrition

    • bread flour for chewiness

    • all purpose for balance

    • my latest mix: 1 cup whole wheat & 3 cups all purpose

  • 2 teaspoons salt

  • Herbs & seasoning

    • ideas: 2 tablespoons dried oregano & 2 tablespoons onion powder

    • I also add a tablespoon of sugar per cup of whole wheat flour

A paddle attachment is great to start mixing with, before moving to a dough hook.

Pour the active yeast & water mixture into a mixing bowl with a paddle. Mix in:

  • 4 tablespoons olive oil

Set aside for later use:

  • extra flour

  • fine cornmeal

Mixing the dough

This dough is just barely sticking to the scraper; if you can work with it, this is a great moisture content.

Now mix in most of the flour mixture at medium speed, about a half cup at a time, changing to a dough hook when the mixer starts chugging. Let the dough hook knead the dough for a few minutes while adding flour small spoonfuls at a time, waiting until it’s well mixed in and the dough starts sticking less to the sides. Depending on measurements and chance, you may have extra flour left over, or you may need more flour. The dough is good when touching it with a finger is very tacky but doesn’t let many strands of dough come off onto your finger. Take the dough ball out of the mixer bowl; add a tablespoon of olive oil to the dirty bowl; place the dough back into the bowl and turn over a couple of times to get oil all over. Cover with plastic or a silicon pad and let rise in a warm place for a couple of hours.


Re-using the same mixing bowl for rising saves on dirty dishes later; I’ve never seen a problem with sticking.

Silicone lids are great items to have around the kitchen.

Forming the dough

I’ve found that weighing the dough is worth the trouble of being able to make the pizzas about the same size, say within 10 grams of what you’re aiming for.

This dough weighs 1030 grams, so 6 pizzas would be about 172 grams each.

Younger helpers are good at chopping dough and forming dough balls.

Weighing is the easiest way to make sure your pizzas are about the same size. Weights +/- 5% are great, this one is over 172 by 5%.

Dough has hopefully about doubled in size after rising. Remove dough into a clean bowl on a tared kitchen scale to get a total dough weight. Then turn onto a cutting board and shove into a rough log for ease of chopping. (Dough should be oily so no flour needed on the cutting board.) Chop into pieces, and trim off and smoosh on to desired weight, depending on what size of pizza you want:

  • My last batch, say, was about 1030 grams, so divided by 6 is about 172 grams

  • 6 pieces at ~ 180 grams makes a medium size of pizza that seems to fit most pizza stones comfortably

Once you have the dough clumps you want, roll each clump between your hands until a nice ball is formed. Smoosh the ball lightly onto a clean cookie sheet or some kitchen bowls, cover with a moist kitchen towel, and refrigerate until needed.


Everybody loves rolling dough.

A cookie sheet and a damp kitchen towel on top is a fine container for refrigerating.

Rolling the dough

I’ve found using a rolling pin easiest. Be liberal with dusting flour; having a flour shaker in your kitchen is a handy tool. Always lift and turn to make sure it’s not sticking; the dough shouldn’t tear easily.

I’ve found using a rolling pin easiest. Be liberal with dusting flour; having a flour shaker in your kitchen is a handy tool. Always lift and turn to make sure it’s not sticking; the dough shouldn’t tear easily.

I’ve also found that using a rolling pin is the best and easiest method for making flat pizza; perhaps that’s from my apple pie crust background, but I see plenty of upsides and no downsides to this method.

When ready to assemble pizzas, take a dough ball and place on a well-floured cutting board, flouring the dough top slightly as well. Roll out the dough firmly, rotating the dough after each roll to make sure it’s not sticking to the cutting board. Roll until the dough is fairly thin and seems to be large enough (10”-12”); the thinner the dough the more it can tear; but at a good thickness it shouldn’t tear easily, and you should be able to pick it up and move it around without fear. Now transfer to your wooden pizza peal or other pizza-making station, top the pizza, and bake. Eat. Savor.

(Baking pizzas is a large topic with lots of opinions, so won’t go into much detail here.)

Young helpers love rolling dough.

The back of a spoon is great for spreading pizza sauce. Adding topping directly on the wooden pizza peel is easy, but make sure the peel has cornmeal to allow the pizza to roll off into the oven, and make sure no topping or sauce get onto the peel (moisture will make the pizza stick).

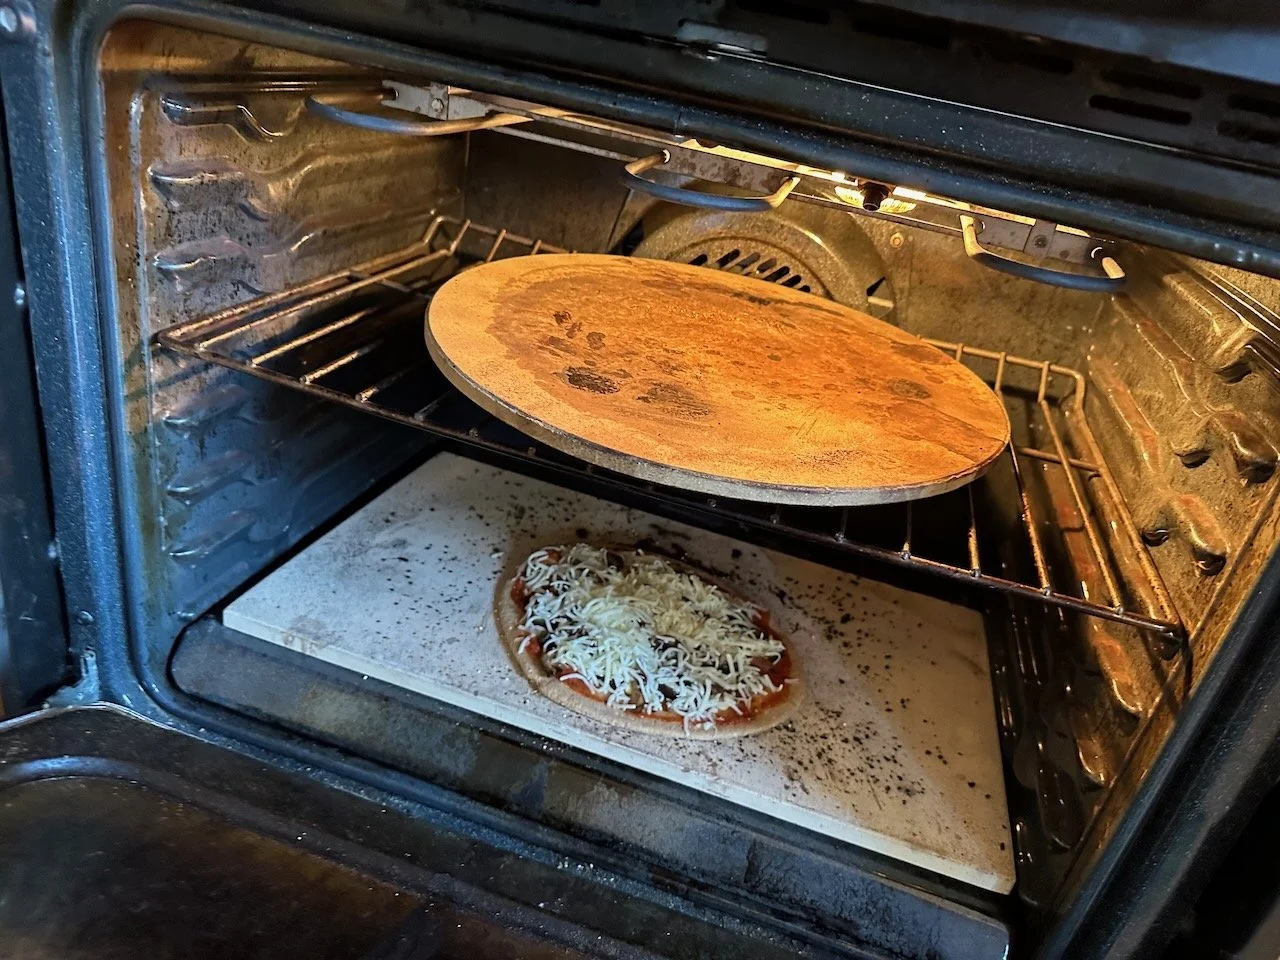
Being familiar with the heat in your oven is immensely helpful. At 500*F our oven radiates a lot from the top, but holds heat at the bottom; so the bottom pizza stone makes a lovely crust, and then halfway through we move to the top pizza stone to brown the toppings. Bonus: we can rotate pizzas in&out of the oven twice as fast.

Moments before being devoured. Letting pizzas fresh out of the oven rest a minute or two before slicing helps set the cheese so it doesn’t ooze, as well as (somewhat) preventing burned tongues from eager mouths.

Resources

article on pizza dough hydration (this recipe is about 75% hydration)

House spice blend

Whenever a quick dinner comes together, you often reach for the simplest preparations…. a few sautéed vegetables, burgers on the cast iron, whatever. Instead of trying to prepare a new spice rub every time, we’ve found that the old standards can include a house blend that you can just add to anything to quickly whip up a taste of home.

Make a quantity of this and then keep it in a covered shaker next to the stove, adding it to vegetables, meats, roasts, whether you want to add some snazz without thinking too hard about it. This one is heavily cumin based, but come up with your own! The trick is to add salt and umami (onion powder here) and then heavily feature one flavor (cumin, here) so it doesn’t just taste like an random blend.

  • 4 parts cumin powder

  • 4 parts onion powder

  • 2 parts paprika

  • 2 parts salt

  • 1 part granulated garlic

Mix together spices. Store in a covered shaker next to the stove. Add to anything.

Simplest Cheesecake Ever

Makes one 9” cheesecake about 2” high

This cheesecake is the simplest I’ve ever found, and the base of several other fun variants that include different cheeses, including marscapone and brie, or other fats like sour cream and butter. By itself it’s smooth and creamy, plain and simple, cheesy and not very sweet, and a great vehicle for toppings such as fresh fruit, stewed fruit syrups, or chocolate drizzles of various bitterness. This recipe generally came from Nick Malgieri’s How to Bake.

Although I tried to be manly and machine-independent when I was in college (mostly because I didn’t have a KitchenAid™), the best way to make this simple cheesecake is with a stand mixer because you can really whip the cream cheese without killing your arm muscles or breaking a wooden spoon or two, both of which I’ve done.

Cheesecakes are almost always cooked in a springform pan, a 9” round pan with sides that you can unbuckle to remove without disturbing the cooked cake sitting on the base. I strongly prefer glass bases with no edges, so a cake server can pull a piece off without running into a metal lip on the base.

Warm the filling ingredients

Set out the filling ingredients to sit at room temperature for a bit:

  • 2 lbs plain cream cheese

  • 1 cup sugar

  • 4 eggs

  • vanilla extract

While those ingredients are warming up (you don’t want to try beating 34°F cream cheese), you can prepare and bake the crust. Crust is always a personal preference, but here’s a simple egg-flour crust that works well. Use either the stand mixer with a second bowl, or a medium mixing bowl.

Making the crust

Mix well in a mixing bowl:

  • 1 cup sugar

  • 1 egg yolk

  • ½ tsp vanilla extract

Measure out in a small mixing bowl:

  • 1 cup flour (? need x-check)

  • 1 tsp baking powder

Fold the flour mixture into the sugar mixture and mix until blended, but no longer, to prevent glutenizing the flour. Pour into the very well buttered springform pan and use your clean, buttered fingers to spread around and squish into the edges of the pan, angling slightly up the side to get a bit higher crust on the edges (does this help with holding a slice together? or is it just personal preference?)

Bake at 350°F for 12min or until a light golden brown. Place on a cooling rack so it’s not hot once you’re ready to pour in the filling.

Making the filling

Add the first 8oz box of cream cheese (or roughly 1/4 of the total if not using 8oz boxes) to the stand mixer and turn on to low speed. Mix until mostly broken up and add the remaining boxes one at a time as each breaks up. Pause to scrape the sides and bottom of the mixing bowl with a rubber spatula. Turn on the mixer to medium speed and gently whip the cream cheese until it’s light and smooth, about � minutes.

Add the sugar, and then do the same: after mixed, pause and scrape the sides and bottom of the bowl with a rubber spatula.

For each egg, do the same: add the egg, mix on slow speed just until incorporated, then pause to scrape the sides and bottom of the mixing bowl. These steps help ensure that no lumps of thick cream cheese remain in the finished cake, and it’s worth taking the time to do so.

Finally, add the vanilla, then mix just until it disappears. Pour into the cooled pie crust. Prepare to cook in a water bath if possible, to prevent burning or otherwise overcooking the crust. Cook in the water bath in a 350°F oven for 50-70min, until the only the center of the cake jiggles when jostled. If the top begins to brown more than your liking before the cake is fully set, cover with tinfoil for the last 20min or so to stop the browning.

Preparing a water bath

What you’ll need:

  • a deep cookie sheet or other pan wider than your springform with almost 1” deep sides

  • extra wide / heavy-duty tinfoil (most tinfoil isn’t much wider than the 9” pan, but you can use two perpendicular regular pieces if needed)

  • hot / boiled water

Place the ready-to-be-baked cheesecake in its springform pan in the center of the tinfoil and wrap up the tinfoil edges to the top of the pan (but not over the edge of the pan). Place the tinfoiled pan onto the cookie sheet, shove into the oven, and then pour about an inch of hot or just boiled water into the cookie sheet. Bake according the above.

Why a water bath?

A water bath is a way of preventing the crust from getting any hotter than the water, which by definition remains below 212°F (at sea level). This helps prevent the crust from overcooking and burning. The water will boil off before getting any hotter than 212°F, and because there’s so much water, it would take several hours to do so, longer than the baking time of a cheesecake. An anecdotal secondary benefit is that it also helps keep the inside of the oven a bit more humid & the cake more moist, although I’m not aware of science experiments that have proven this. Just be sure that the water never gets any higher than the tinfoil, otherwise you’re going to get a soggy crust.
Lemon Poppyseed Yogurt Pancakes

Makes about 24 x 4-inch pancakes.

We love light & fluffy pancakes as a treat for Sunday brunch. We have a Meyer lemon tree in the back so look for ways to use them up, and yogurt is a good way to keep pancakes fluffy without bothering with a whipped-egg-white soufflé-type pancake. This recipe has, as often happens, converged from a variety of sources, including The Joy of Cooking.

Both ingredient bowls can hold for a bit until you’re ready to cook. When ready, heat up an electric skillet to 350°F and follow the standard pancake procedure.

In a large bowl, whisk together dry ingredients:

  • 2 cups white flour

  • 2 teaspoons baking powder

  • ½ teaspoon baking soda

  • 1 teaspoon salt

In a medium bowl, whisk together wet ingredients:

  • ⅔ cup Greek yogurt (if you use more liquid yogurt, cut down on the milk)

  • ⅓ cup sour cream

  • 2 eggs

  • ½–¾ cup whole milk (start low until you mix into dry ingredients)

  • ¼ lemon juice (about 1 lemon)

  • zest of 2 lemons

  • 1 tsp. vanilla extract

  • ¼–½ cup poppy seeds (your taste)

When ready to cook, fold the wet ingredients into the dry ingredients and mix, not forgetting to rubber scrape the bottom and sides so you don’t get clumps of dry flour on the bottom. The batter should be pretty fluid but not thin; adjust with extra milk or white flour until the consistency is right. Cook following standard pancake procedure.

Toppings we’ve enjoyed:

Fresh Maine Blueberries & Syrup

Mix a few cups of fresh Maine blueberries with enough maple syrup to leave the blueberries coated, and with a bit of syrup in the bottom of the bowl; but make sure the berries are not sitting or drowning in syrup. Serve the bowl of berries with a ladle alongside the pancakes. Substitute 1 cup whole wheat flour for 1 cup of the white flour in the pancakes if you want to make things a bit more Maine-hearty.

Notes to Self

  • Maybe our kitchen is overheating too often, but our poppy seeds always turn rancid sitting in the spice cupboard. Leave them in the freezer until you’re ready to use them, similar to other sensitive nuts and oils.

  • With a sweet (maple syrup) topping, the tartness of the pancake balances is needed, so don’t add any sugar or syrup to the batter.